Windows Does Not See Disk on KVM VPS – How to Load VirtIO Drivers

When installing Windows Server (2012, 2016, 2019, 2022) or Windows 10/11 from a custom ISO on a KVM virtual server, almost everyone runs into the same roadblock: you reach the partition screen and the drive list is completely empty. Windows does not ship with built-in paravirtualized VirtIO storage drivers.

Quick answer: attach Fedora’s official virtio-win.iso as a second virtual CD-ROM, click Load driver in the Windows installer, and browse to viostor\<your_Windows>\amd64 (or vioscsi\... if your KVM host uses a VirtIO SCSI controller).
Why Install VirtIO Instead of Switching the Disk to IDE
The first time I installed Windows Server on a KVM VPS at TheHost, support offered the classic shortcut: switch the virtual disk bus to IDE so the built-in Windows driver sees it immediately.
IDE works, but it forces full legacy hardware emulation – higher CPU overhead and noticeably lower NVMe/SSD IOPS. VirtIO talks directly to the KVM hypervisor without emulation bottlenecks, making disk I/O and networking much faster.
Step-by-Step: Loading VirtIO Storage Drivers During Windows Setup
- Download the latest stable
virtio-win.isofrom Fedora Project: direct link to stable virtio-win.iso (older builds like0.1.96or0.1.109are outdated; the current stable ISO includes signed drivers all the way up to Windows 11 and Server 2022/2025). - Mount
virtio-win.isoto your VM in your VPS control panel (or Proxmox) as a second virtual CD/DVD drive. If your panel only allows one ISO at a time, swap the Windows ISO forvirtio-win.isoat the disk screen, load the driver, and swap the Windows ISO back before clicking Next. - On the “Where do you want to install Windows?” screen, click Load driver → Browse and open the mounted
virtio-windisc. - Pick the folder matching your OS version and
amd64architecture:viostor\<version>\amd64– if KVM attaches the disk as VirtIO Block (most common; shows up as Red Hat VirtIO SCSI controller);vioscsi\<version>\amd64– if KVM uses a VirtIO SCSI controller (common default in Proxmox and newer VPS panels).
- Click Next – your SSD/NVMe drive appears within seconds, and installation proceeds normally.
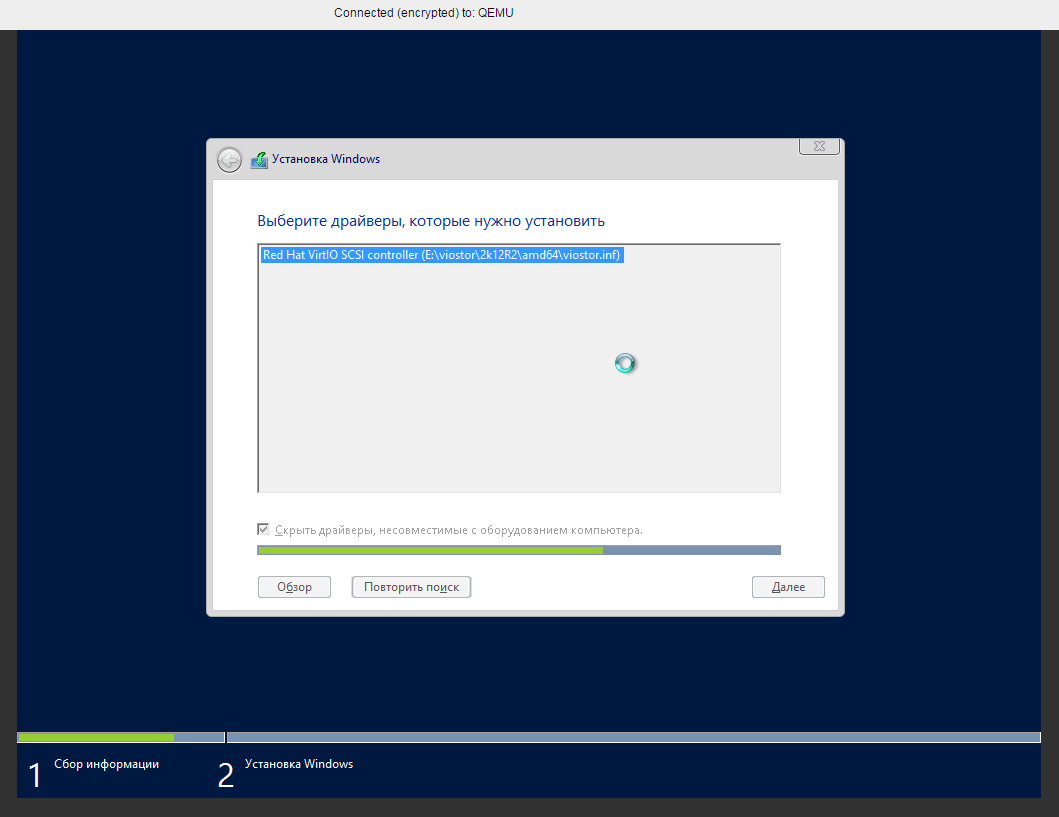
Troubleshooting Reader Issues
- “Windows still does not see any driver inside virtio-win.iso.” Usually one of two things: you opened
viostorwhen the VM actually usesvioscsi(check the sibling folder!), or you picked the wrong OS folder (2k12R2,2k19,2k22,w10,w11). Note: if Windows asks for a media driver right after the language screen, that points to a corrupted Windows ISO rather than KVM storage drivers. - No network adapter after Windows boots. The network driver sits in
NetKVMon the same ISO. Even easier: once logged into Windows, runvirtio-win-guest-tools.exefrom the root ofvirtio-win.isoto install disk, network, memory balloon, and QEMU guest agent drivers in one shot.
KVM VPS Providers Supporting Custom Windows ISOs
If you need a KVM VPS where you can mount your own Windows ISO:
- TheHost – Ukrainian data center with low local ping and budget KVM plans (use promo code
referal-7912-promofor a discount). - Fornex – fast NVMe KVM VPS in Europe and the US (7% off VPS via my link).
Disclosure: the TheHost and Fornex links are affiliate links – you get the discount, and the blog earns a small commission.
Once the right VirtIO driver is loaded, Windows installs smoothly and your virtual NVMe runs at full native speed instead of crawling in IDE emulation mode.